Cable drums arriving on a project site represent a significant material investment — sometimes millions of dollars for a large EPC project. The period between delivery and installation is when that investment is most vulnerable: incorrect storage damages cable sheaths and insulation, improper handling crushes cable and splits drum flanges, and poor site tracking leads to the wrong cable being cut from the wrong drum, leaving unusable short offcuts and requiring additional procurement.
This guide covers the complete lifecycle of a cable drum on a project site — from incoming inspection through storage, handling, cable-out, cut management, and the drum register system that tracks every metre from delivery to installation. It is written for site electrical engineers, project procurement managers, and storeroom supervisors responsible for cable management on industrial and infrastructure construction projects.
Incoming Inspection on Delivery
Cable drum incoming inspection is the last opportunity to identify non-conformances before the supplier’s liability for damage ends. Do not accept cable delivery without conducting a basic incoming inspection — damage or non-conformance discovered after the delivery vehicle has left is much harder to claim against the supplier.
What to Check on Delivery
- Drum count: count the number of drums delivered against the packing list — do not sign the delivery receipt until the count is confirmed
- Drum tags: check each drum tag against the packing list — drum number, cable type, voltage grade, and length should match for every drum
- Cable surface marking: inspect the cable sheath marking on the outer layer of each drum — verify that the cable type, voltage grade, standard, and manufacturer are printed on the sheath as specified in the purchase order
- Sheath condition: visually inspect the outer cable sheath for cuts, abrasions, gouges, or crushing visible on the outer layers of the wound cable — damage to the outer layers may indicate damage to inner layers from rough handling in transit
- Drum condition: check drum flanges and lagging for cracks, splits, or missing sections — damaged drum flanges cannot support the drum weight correctly in storage and may allow the cable to unwind
- End caps and seals: both cable ends should be sealed with heat-shrink end caps or tape — open cable ends allow moisture ingress into the conductor strands, particularly important for aluminum conductors
- Drum weight: where practical, spot-check one or two drum weights against the packing list — a drum significantly lighter than stated may indicate shorter cable length than specified
Key Point: Record the condition of every drum at delivery in the cable register — including any damage observed, even if apparently minor. If a drum is found to have sheath damage at installation that was not recorded at delivery, it is difficult to prove the damage occurred in transit rather than on site. Photographs of damaged drums at the time of delivery are valuable evidence for supplier claims.
Partial Acceptance and Rejection
Where damage is found on delivery:
- Clearly note the damage on the delivery receipt before signing — ‘Received subject to inspection: Drum [number] shows sheath damage’ is sufficient
- Photograph the damaged drum alongside the delivery paperwork to establish the link between the damage and the delivery event
- Do not reject the entire delivery for damage to one or two drums unless the damage is severe — partial acceptance with documented reservations is standard practice
- Notify the supplier in writing within 24–48 hours of any damage found at delivery — most supply contracts have a short window for raising delivery claims
Correct Storage Orientation and Surface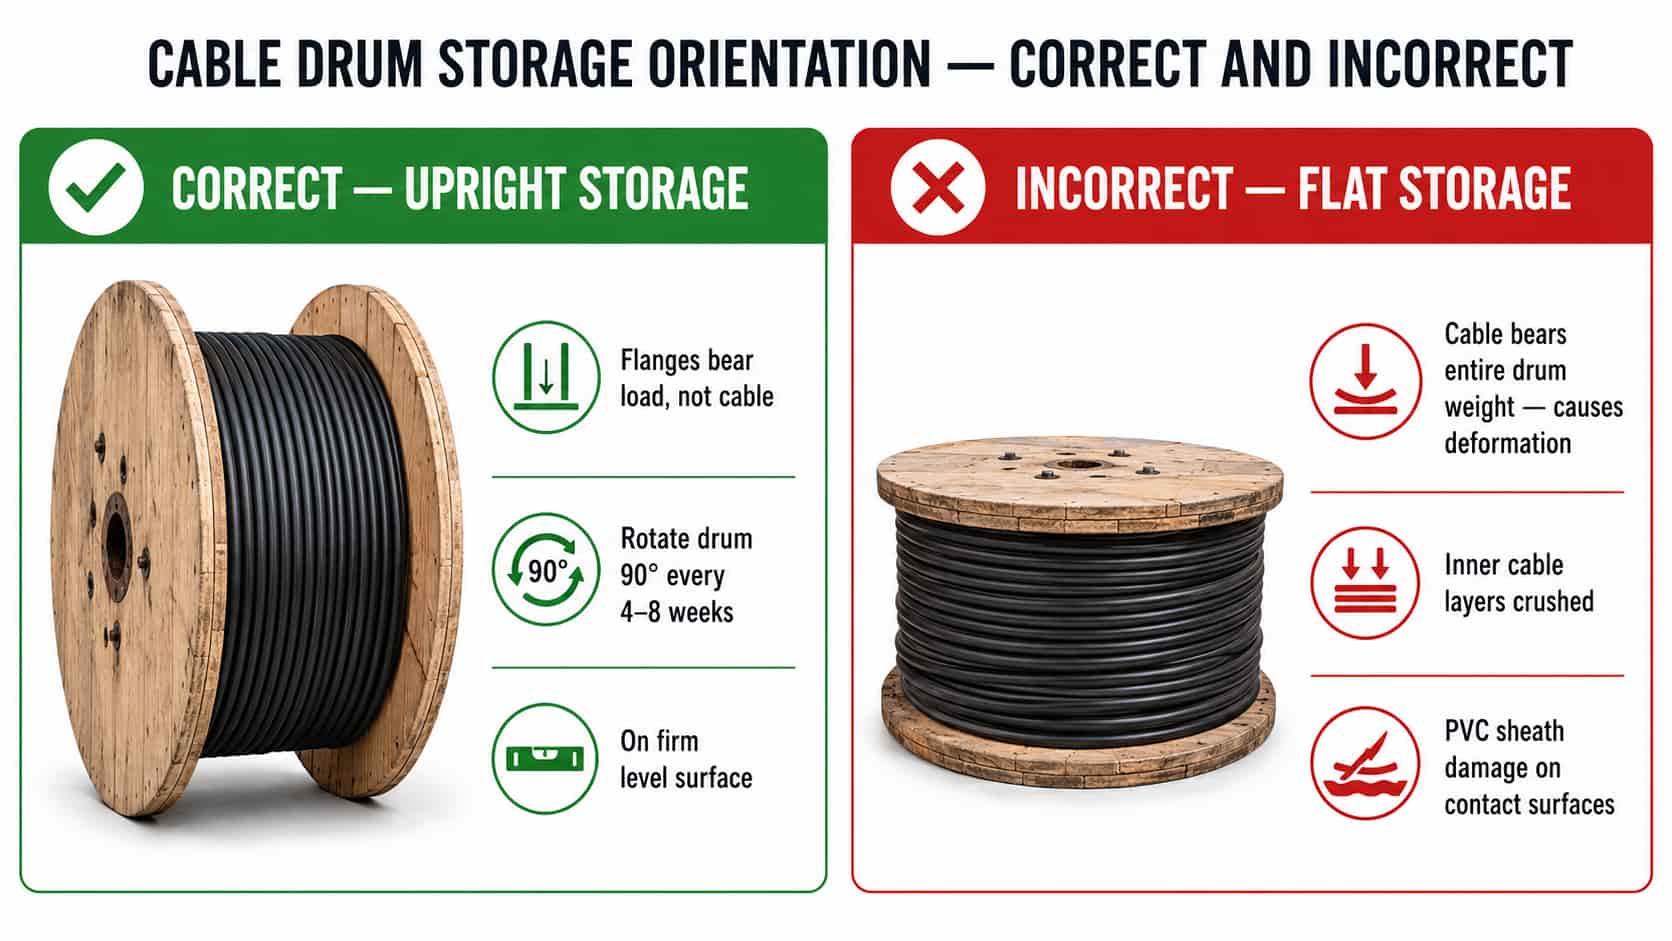
Always Store Drums Upright
Cable drums must always be stored in the upright position — standing on their flange rims with the drum axle horizontal. This is the single most important rule in cable drum storage:
- Upright storage: the drum flanges bear the weight of the drum and cable — the cable itself bears no compression load
- Flat storage (drum lying on its side, axle vertical): the weight of the cable on the upper half of the drum compresses the cable on the lower half — causes permanent deformation of the cable cross-section, insulation cracking, and in severe cases conductor strand damage
- Never stack drums on their sides — even for short periods. A drum that arrives flat after transport must be righted immediately
Storage Surface Requirements
The storage surface under cable drums must be firm, level, and free of sharp objects:
- Firm surface: compacted gravel, concrete, or asphalt — soft soil will allow the drum to sink unevenly, tilting the drum and causing uneven loading on the flanges
- Level surface: drums stored on sloped ground will slowly roll — even a slight gradient. Chock drums on both sides of the flange with timber wedges on any slope
- Clear of sharp objects: stones, metal off-cuts, or debris under the drum flange can damage the flange and may puncture the cable sheath on the outermost cable layer
- Drainage: the storage area must drain freely — cable drums standing in pooled water accelerate wooden drum deterioration and allow moisture to wick into the cable ends
Periodic Drum Rotation
For cables stored for more than 4–8 weeks before installation, the drums should be rotated 90° around their axis every 4–8 weeks. This redistributes the load on the cable and prevents the cable on the flange contact point from being permanently deformed by sustained pressure.
This rotation requirement is particularly important for:
- Cables stored during tropical rainy seasons where high humidity and temperature accelerate sheath deformation
- Large-cross-section cables (185mm² and above) where the cable weight is significant and deformation risk is higher
- XLPE-insulated cables that are sensitive to sustained deformation at high ambient temperatures
Environmental Protection During Storage
Cable stored on site is subject to environmental conditions that can degrade the cable sheath, end seals, and wooden drum over the storage period. The level of protection required depends on the duration of storage and the site environment.
UV and Sun Exposure
Standard PVC cable sheaths have limited UV resistance — prolonged direct sunlight exposure causes the PVC to become brittle and crack, reducing mechanical protection and potentially affecting insulation performance.
- For storage periods under 4 weeks: standard PVC sheath cable in direct sunlight is generally acceptable in temperate climates
- For storage periods of 4–12 weeks in tropical or desert climates: cover drums with UV-resistant tarpaulins or store under a shade structure
- For storage periods above 12 weeks in any climate: store under cover — a temporary shelter, warehouse, or opaque tarpaulin — regardless of cable sheath type
- HDPE and UV-stabilized PVC sheaths have better UV resistance but should still be covered for extended storage
Temperature Extremes
Cable should be stored within the manufacturer’s specified storage temperature range:
- Standard PVC-sheathed cable: storage temperature typically -15°C to +60°C — no special precautions needed in most climates
- XLPE cable: storage temperature typically -40°C to +70°C — more tolerant of extremes
- For installation in cold climates: if cable is to be installed at temperatures below 0°C, it must be pre-warmed before handling — cold cable sheaths become brittle and crack when bent during installation. Store cable in a heated area or warm it with a fan heater for 24 hours before installation
- In high-temperature desert storage: direct sun on dark cable sheaths can raise surface temperature to 70–80°C — this exceeds the rated storage temperature for standard PVC. Always cover drums in desert storage
Note: The storage temperature limitation applies to the cable sheath temperature — not the ambient air temperature. In direct tropical sunlight, a black PVC cable sheath can reach 80°C surface temperature when the ambient air is 40°C. Cover drums to avoid this.
Wooden Drum Protection
Wooden cable drums are subject to deterioration from moisture, insects, and sun exposure. For extended site storage:
- Stand drums on timber bearers or pallet stands — never directly on soil or wet concrete, which accelerates moisture absorption into the drum base
- Check for insect damage (particularly termite attack in tropical climates) at each periodic drum rotation
- If the ISPM 15 heat-treatment stamp was applied to the drum during manufacture, the wood has been heat-treated but is not permanently resistant to subsequent moisture or insect attack in service
- Steel drums: not subject to moisture deterioration, but may develop surface rust at contact points — this is cosmetic and does not affect the cable
Cable Drum Handling Equipment and Techniques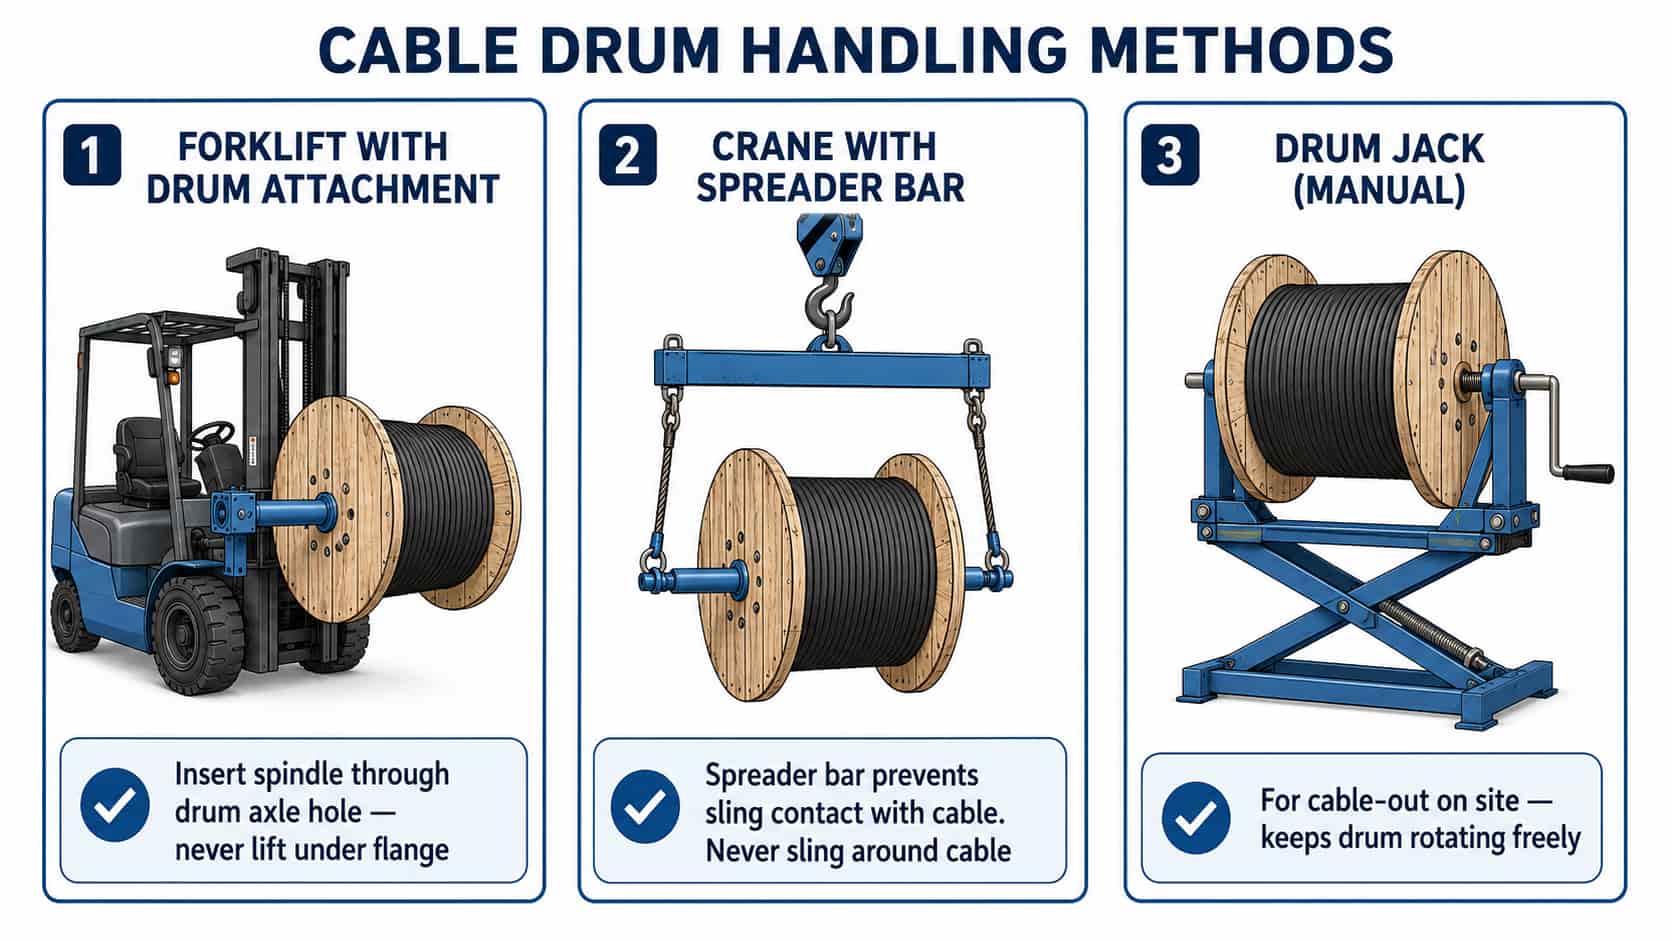
Incorrect handling of cable drums is one of the most common causes of cable damage on project sites. The handling method must match the drum size and weight.
Weight Estimation
Before handling, confirm the approximate drum weight from the packing list or cable datasheet. Common weight ranges:
- Small drums (up to 500mm flange diameter): typically 50–300kg — can be rolled short distances by hand with 2–3 people; requires drum trolley for longer distances
- Medium drums (500mm–1200mm flange diameter): typically 300kg–2,000kg — requires forklift or crane
- Large drums (1200mm–2500mm flange diameter): typically 1,500kg–15,000kg — requires heavy forklift, crane, or specialist cable handling equipment
Forklift Handling
Forklifts are the most common equipment for cable drum handling on construction sites. The correct method uses a drum spindle attachment:
- Insert the forklift spindle (a horizontal bar) through the drum axle hole — the drum hangs from the spindle by its flanges
- Never attempt to lift a cable drum using standard fork blades under the drum flange — the blade edge will damage the flange and the load is unstable
- Check the spindle length against the drum width — the spindle must extend beyond both drum flanges to prevent the drum sliding off during transport
- Confirm the forklift rated capacity covers the drum weight at the lifting radius — rated capacity decreases as the load moves away from the mast
- Never transport a drum at height — carry drums as low as possible with the mast tilted back
Crane Handling
For very large drums that exceed forklift capacity, a crane with a spreader bar is required:
- Thread wire rope or chain slings through the drum axle hole on each side of the drum — slings should pass through the axle bore, not around the drum flanges
- Use a spreader bar between the two sling lift points to prevent the slings from bearing on the drum flanges or the cable
- Never sling a cable drum around the cable itself — even heavy-duty slings under cable will deform the wound cable and damage the sheath and insulation
- Check sling capacity against the drum weight plus a 50% safety factor for dynamic loading during lift
Rolling Drums by Hand
Small drums can be rolled short distances by hand — rolling the drum on its flange rims along a firm, flat surface:
- Always roll drums in the direction of cable winding — rolling in the opposite direction loosens the cable on the drum and may allow the outer layers to unwind
- The direction of correct rolling is indicated by an arrow on the drum flange — observe this arrow
- Never roll drums over rough ground, pipe, or other objects that could contact the cable sheath on the outer layer of the wound cable
- On slopes, have personnel positioned downhill to control the drum — a runaway cable drum is a serious site safety hazard
Key Point: Before rolling any drum, check the drum flange for cracks — a cracked flange can fail under the rolling load, causing the drum to collapse. Replace cracked drums or transfer the cable to a replacement drum before any handling.
Cable-Out: Unreeling Cable from the Drum
Unreeling cable from the drum during installation requires a drum stand or jack to allow the drum to rotate freely as the cable is pulled off. Do not pull cable off a stationary drum lying on its side — this causes the cable to kink and twist, damaging the armor wires and potentially the insulation.
Drum Stand and Drum Jack
- Drum stand (A-frame): a fixed A-frame structure with a horizontal axle that the drum sits on — allows the drum to spin freely as cable is paid out. Suitable for cable-out along a clear route where the drum can remain stationary
- Drum jack (scissor jack): a portable hydraulic or mechanical device that raises the drum off the ground on a spindle, allowing it to rotate. More flexible than a fixed stand for positioning at the required point on the route
- Drum spindle: a steel bar through the drum axle hole, supported at both ends — the minimum requirement for a controlled cable-out. The spindle must be supported to keep the drum level during rotation
Minimum Bending Radius
During cable-out, the cable must not be bent below its minimum bending radius — the tightest bend the cable can sustain without permanent deformation of the insulation or armor:
- Typical minimum bending radius for armored LV cable: 12× cable outer diameter
- Typical minimum bending radius for armored MV cable: 15× cable outer diameter
- Example: a 52mm OD armored cable has a minimum bending radius of 52 × 12 = 624mm — the cable must not be bent around any radius tighter than 624mm during pulling or installation
- The minimum bending radius is printed on the cable drum tag and in the cable datasheet — always check before routing the cable around corners or through duct bends
Cable Pulling Tension
When pulling cable through duct or conduit, the pulling tension must not exceed the cable’s rated maximum pulling tension. Excessive tension stretches and damages the conductor strands and can displace the insulation relative to the conductor:
- Maximum pulling tension for copper conductor: approximately 50 N/mm² × conductor cross-section area — for 95mm² copper: 50 × 95 = 4,750N (approximately 485kg)
- Maximum pulling tension for aluminum conductor: approximately 30 N/mm² × conductor cross-section area
- For long duct pulls, calculate the expected pulling tension based on cable weight per metre, duct length, and coefficient of friction — use a cable pulling lubricant to reduce friction
- Install a cable pulling sock (Chinese finger grip) over the cable end — never attach the pulling rope directly to the cable conductor
Cable Cut Management and Offcut Tracking
One of the most wasteful and avoidable problems on cable-intensive projects is poor cut management — cutting cable lengths incorrectly and generating large, unusable offcuts. A cut management process prevents this.
Measure Twice, Cut Once
- Before cutting any cable, physically measure the cable route from end to end — do not estimate from a drawing without field verification
- Add the correct termination tail length to each end: typically 1.0–1.5m extra at each termination point for the cable to reach the terminal box, form the stress cone, and allow for trimming
- For cables pulled through duct, add the duct length plus both termination tails — the duct dimension is not the same as the cable length needed
- Only cut after the route length has been confirmed and the drum label verified as the correct cable type
Recording Cuts and Offcuts
- Record every cut in the drum register: drum number, cable type, length cut, date, and the cable tag number it was cut for
- Measure and record the remaining offcut length on the drum — tape the measured remaining length to the drum tag for easy future reference
- Short offcuts (under 5m): label clearly with cable type and remaining length; store separately from full drums to avoid confusion
- Offcuts of sufficient length for future runs: add to the cable register as available stock — many projects can satisfy short cable runs from offcuts rather than opening new drums
Cable Register and Drum Tracking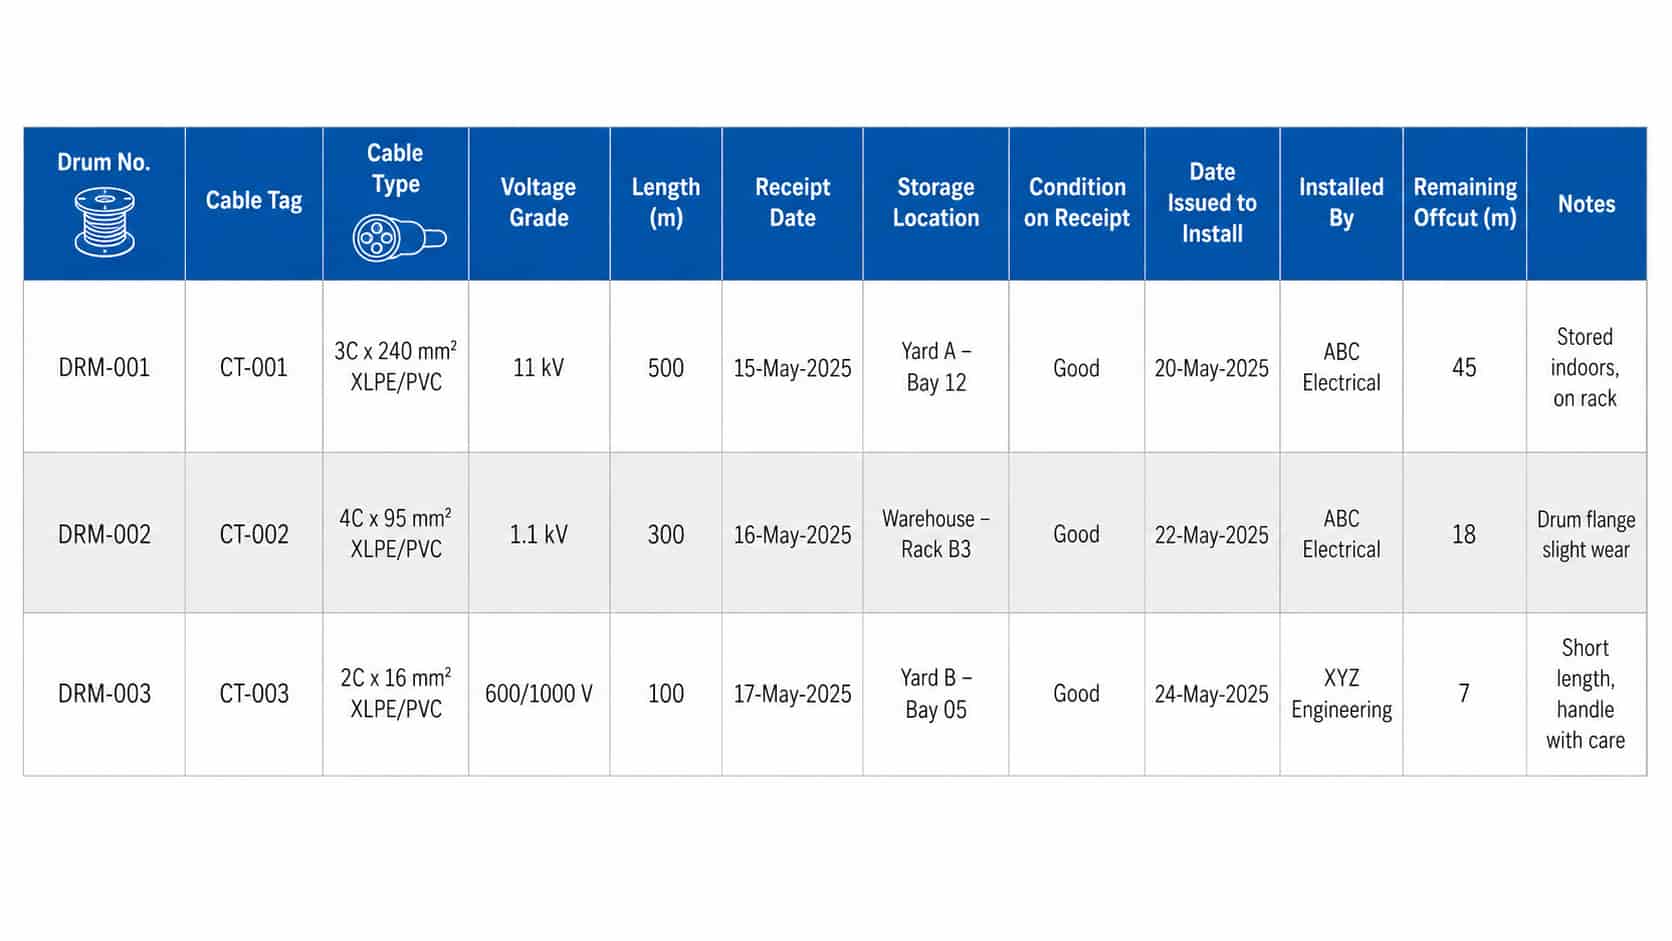
The cable register is the project document that tracks every cable drum from delivery to installation. On small projects, a spreadsheet is adequate. On large EPC projects, the cable register may be integrated into the project’s material management system.
A complete cable register records the following for every drum:
- Drum number: unique identifier matching the drum tag and packing list
- Cable tag (from cable schedule): the project reference for the cable runs the drum is allocated to
- Cable type: full technical designation
- Voltage grade and cross-section
- Total drum length as received (m)
- Date received and condition on receipt
- Storage location: bay number, row, or GPS coordinate for large laydown areas
- Date issued to installation team
- Cuts made: date, length cut, cable tag number for each cut
- Remaining offcut length after each cut
- Final disposition: fully installed, offcut returned to store, or written off
Tip: For projects with more than 50 drums, assign each storage location a physical label or painted bay number — not just a spreadsheet reference. Site teams under time pressure will not look up a spreadsheet before picking up a drum. Physical bay labels prevent the wrong drum being opened for a run that does not match the cable type.
End-of-Project Drum Returns and Disposal
At the end of a project, cable drums and offcuts require disposal or return:
- Drum return to supplier: some suppliers accept drum returns for a credit against the deposit paid at purchase. Confirm the drum return policy and deposit amount in the purchase order — not after the project is complete
- Cable offcuts: short offcuts with residual value should be quantified and returned to the supplier or sold to a cable recycler — copper and aluminum conductor offcuts have significant scrap value
- Wooden drum disposal: wooden drums that cannot be returned must be disposed of in accordance with local waste regulations — some regions prohibit burning treated wood. Check local regulations before any drum burning on site
- Project documentation: the completed cable register should be included in the as-built documentation package — it provides a record of cable types installed in each location for future maintenance reference
Quotation Requirements
RichingPower supplies power cables, control cables, and instrumentation cables for industrial and infrastructure projects, with drum lengths and packaging optimized for site handling. When requesting a quotation, advise if specific drum length or drum size constraints apply to your project site — for example, maximum drum diameter for available handling equipment or maximum drum weight for site crane capacity. This allows us to optimize the drum configuration for your site conditions.
Submit your cable specification via the RichingPower contact page. For projects with a cable schedule, attach the schedule for an itemized quotation with drum length optimization for each cable type.
Conclusion
Cable drum management on a project site is a practical discipline that protects the cable investment, prevents installation delays, and avoids the waste and cost of incorrect cuts. The key principles are simple: receive with inspection, store upright on a firm surface, handle with the correct equipment, measure before cutting, and record every drum movement in the cable register.
Projects that implement these practices from the first delivery avoid the most common site cable management problems — sheath damage from flat storage, drum handling accidents, wrong cables cut for the wrong runs, and untraceable offcuts. Projects that do not have a cable management system in place before the first delivery arrive are usually the ones that run out of the right cable type at the wrong time.
For guidance on cable specification and ordering, see How to Read a Cable Specification Sheet. For underground cable installation methods that determine how cable is pulled from the drum, see
Underground Cable Installation Guide: Direct Burial, Duct and Cable Tray. Contact RichingPower with your project cable schedule for a quotation.